No. 0320
Wailmer
Ball Whale Pokémon
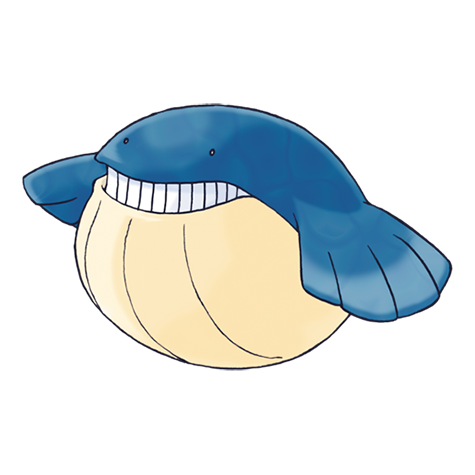
Turn it with the arrows or by dragging · pinch or scroll to zoom. Fan-made model from the Pokémon 3D API project.
- Height
- 2 m 6′07″
- Weight
- 130 kg 286.6 lbs
- Base stat total
- 400 top 62%
- Introduced
- Gen III
When it sucks in a large volume of seawater, it becomes like a big, bouncy ball. It eats a ton of food daily.See all 11 entries
Base stats
Ranges: 0 IV/EV with a hindering nature to 31 IV/252 EV with a helpful nature. EV yield: 1 HP.
Stat calculatorChampions Stat Points & Stat Alignment, or EVs, IVs & nature
Speed tiers
Speed at Lv 50 in Pokémon Champions (base 60). Scarf and Tailwind use the Max+ value.
At max Speed, Wailmer outspeeds 12 of the 30 most used Pokémon in Champions VGC.
- 203
 Mega Garchomp ZModest · 32 SP · #21 in usage
- 200
 Mega GengarTimid · 32 SP · #26 in usage
- 190
 Mega Raichu YTimid · 23 SP · #13 in usage
- 189
 Mega SalamenceTimid · 32 SP · #4 in usage
- 184
 WhimsicottTimid · 32 SP · #23 in usage
- 178
 Mega MetagrossJolly · 32 SP · #28 in usage
- 178
 Mega StaraptorJolly · 32 SP · #29 in usage
- 172
 SneaslerAdamant · 32 SP · #2 in usage
- 169
 Mega FloetteTimid · 32 SP · #17 in usage
- 169
 GarchompJolly · 32 SP · #19 in usage
- 167
 Mega Charizard YTimid · 32 SP · #14 in usage
- 167
 Mega GardevoirTimid · 32 SP · #20 in usage
- 161
 IndeedeeTimid · 32 SP · #30 in usage
- 156
 Hisuian ArcanineJolly · 32 SP · #16 in usage
- 150
 ArchaludonTimid · 32 SP · #9 in usage
- 149
 GholdengoTimid · 32 SP · #8 in usage
- 143
 BasculegionJolly · 32 SP · #6 in usage
- 128
 PelipperTimid · 32 SP · #12 in usage
- 123Wailmer · Max+32 SP, Speed-raising alignment
- 120
 VolcaronaBold · 0 SP · #25 in usage
- 112Wailmer · Max32 SP, neutral alignment
- 105
 RillaboomAdamant · 0 SP · #1 in usage
- 101
 MiloticCalm · 0 SP · #15 in usage
- 95
 SylveonModest · 15 SP · #18 in usage
- 94
 Female IndeedeeRelaxed · 0 SP · #7 in usage
- 90
 PolitoedCalm · 0 SP · #22 in usage
- 90
 SinistchaBold · 0 SP · #24 in usage
- 85
 ArmarougeQuiet · 0 SP · #27 in usage
- 80Wailmer · No SP0 SP, neutral alignment
- 80
 IncineroarCareful · 0 SP · #3 in usage
- 80
 FarigirafBold · 0 SP · #11 in usage
- 70
 KingambitAdamant · 0 SP · #5 in usage
- 60
 Mega GolisopodAdamant · 0 SP · #10 in usage
Others at their most common Speed investment in Champions VGC (Reg M-C · Doubles, Sep 2026); Pokémon holding a Mega Stone are shown as their Mega.
Type matchups
Weak to
Resists
Takes normal damage from 12 types
Abilities
- Water Veil
Prevents burns.
- Oblivious
Prevents infatuation and protects against Captivate.
- PressureHidden ability
Increases the PP cost of moves targetting the Pokémon by one.
Competitive
Not used in the tracked Showdown formats this month.
Evolution


Moves
Level up 16
TM / HM / TR 25
Egg moves 13
No moves match those filters.
Pokédex entries
- Category
- Ball Whale Pokémon
- Debut
- Hoenn · Ruby & Sapphire
- Color
- Blue
- Shape
- Habitat
- Sea
- Pal Park area
- Sea
Due to their memories of when they once lived on land, pods of them will, very rarely, wash up on shore.
Ultra MoonIt swims along with its mouth open and swallows down seawater along with its food. It sprays excess water out of its nostrils.
Ultra SunIt shows off by spraying jets of seawater from the nostrils above its eyes. It eats a solid ton of Wishiwashi every day.
Moon · SwordIt loves to startle people. It fills itself up with seawater and plays by bouncing around like a ball.
SunIt eats one ton of food every day. It plays by shooting stored seawater out its blowholes with great force.
Black 2 · White 2 · YIt bounces playfully like a ball. The more seawater it swallows, the higher it bounces.
HeartGold · SoulSilver · XOn sunny days, it lands on beaches to bounce like a ball and play. It spouts water from its nose.
Diamond · Pearl · Platinum · Black · WhiteWhen it sucks in a large volume of seawater, it becomes like a big, bouncy ball. It eats a ton of food daily.
FireRed · LeafGreen · ShieldWhile this Pokémon usually lives in the sea, it can survive on land, although not too long. It loses vitality if its body becomes dried out.
EmeraldWAILMER can store water inside its body to transform itself into a ball for bouncing around on the ground. By filling itself up with more water, this Pokémon can elevate the height of its bounces.
Sapphire · Alpha SapphireWAILMER’s nostrils are located above its eyes. This playful Pokémon loves to startle people by forcefully snorting out seawater it stores inside its body out of its nostrils.
Ruby · Omega Ruby
Names around the world
- Japanese
- ホエルコ
- Japanese (romaji)
- Hoeruko
- Korean
- 고래왕자
- Chinese (Traditional)
- 吼吼鯨
- Chinese (Simplified)
- 吼吼鲸
- French
- Wailmer
- German
- Wailmer
- Spanish
- Wailmer
- Italian
- Wailmer
Sprites
Tap any sprite to show it on the Pokédex above. ▶ marks official animations; Gen VIII–IX models are large, so they load only when you tap them.
Official artwork
3D models
Generation III
Generation IV
Generation V
Generation VI
Generation VII
Generation VIII · animated models
Training
- EV yield
- 1 HP
- Catch rate
- 125 ≈16.3% with a Poké Ball at full HP
- Base friendship
- 70
- Base experience
- 80
- Growth rate
- Fluctuating
Breeding
- Egg groups
- FieldWater 2
- Gender
- ♂ 50%♀ 50%
- Hatch time
- 40 egg cycles ≈10,455 steps (Gen IV–VII)
Where to find
Shield: The Crown Tundra 2 areas
- Frigid SeaFishing at bubbling spots in the water, Surfing in the overworld · Lv 60–65
- Max LairCapture during a Dynamax Adventure. · Lv 65
Shield: The Isle of Armor 6 areas
- Honeycalm IslandSurfing in the overworld · Lv 40–60
- Honeycalm SeaSurfing in the overworld · Lv 40–60
- Honeycalm Sea (Max Den E)Catch a wild Dynamax or Gigantamax Pokémon in a Max Raid battle. · Lv 25–50
- Insular Sea (Max Den D)Catch a wild Dynamax or Gigantamax Pokémon in a Max Raid battle. · Lv 25–50
- Stepping-Stone Sea (Max Den G)Catch a wild Dynamax or Gigantamax Pokémon in a Max Raid battle. · Lv 25–50
- Workout Sea (Max Den A)Catch a wild Dynamax or Gigantamax Pokémon in a Max Raid battle. · Lv 25–50
Sword: The Crown Tundra 2 areas
- Frigid SeaFishing at bubbling spots in the water, Surfing in the overworld · Lv 60–65
- Max LairCapture during a Dynamax Adventure. · Lv 65
Sword: The Isle of Armor 6 areas
- Honeycalm IslandSurfing in the overworld · Lv 40–60
- Honeycalm SeaSurfing in the overworld · Lv 40–60
- Honeycalm Sea (Max Den E)Catch a wild Dynamax or Gigantamax Pokémon in a Max Raid battle. · Lv 25–50
- Insular Sea (Max Den D)Catch a wild Dynamax or Gigantamax Pokémon in a Max Raid battle. · Lv 25–50
- Stepping-Stone Sea (Max Den G)Catch a wild Dynamax or Gigantamax Pokémon in a Max Raid battle. · Lv 25–50
- Workout Sea (Max Den A)Catch a wild Dynamax or Gigantamax Pokémon in a Max Raid battle. · Lv 25–50
Shield 11 areas
- Bridge Field (Max Den G)Catch a wild Dynamax or Gigantamax Pokémon in a Max Raid battle. · Lv 25–40
- East Lake Axewell (Max Den E)Catch a wild Dynamax or Gigantamax Pokémon in a Max Raid battle. · Lv 25–40
- Lake of Outrage (Max Den A)Catch a wild Dynamax or Gigantamax Pokémon in a Max Raid battle. · Lv 25–40
- Motostoke RiverbankSpecial overworld spawn in a fixed location in the water. · Lv 56–60
- North Lake Miloch (Max Den E)Catch a wild Dynamax or Gigantamax Pokémon in a Max Raid battle. · Lv 15–30
- North Lake Miloch (Max Den F)Catch a wild Dynamax or Gigantamax Pokémon in a Max Raid battle. · Lv 15–30
- Route 9 (Circhester Bay)Fishing at bubbling spots in the water, Surfing in the overworld · Lv 39–43
- South Lake Miloch (Max Den C)Catch a wild Dynamax or Gigantamax Pokémon in a Max Raid battle. · Lv 25–40
- South Lake Miloch (Max Den D)Catch a wild Dynamax or Gigantamax Pokémon in a Max Raid battle. · Lv 15–30
- South Lake Miloch (Max Den E)Catch a wild Dynamax or Gigantamax Pokémon in a Max Raid battle. · Lv 15–30
- West Lake Axewell (Max Den F)Catch a wild Dynamax or Gigantamax Pokémon in a Max Raid battle. · Lv 25–40
Sword 11 areas
- Bridge Field (Max Den G)Catch a wild Dynamax or Gigantamax Pokémon in a Max Raid battle. · Lv 25–40
- East Lake Axewell (Max Den E)Catch a wild Dynamax or Gigantamax Pokémon in a Max Raid battle. · Lv 25–40
- Lake of Outrage (Max Den A)Catch a wild Dynamax or Gigantamax Pokémon in a Max Raid battle. · Lv 25–40
- Motostoke RiverbankSpecial overworld spawn in a fixed location in the water. · Lv 56–60
- North Lake Miloch (Max Den E)Catch a wild Dynamax or Gigantamax Pokémon in a Max Raid battle. · Lv 15–30
- North Lake Miloch (Max Den F)Catch a wild Dynamax or Gigantamax Pokémon in a Max Raid battle. · Lv 15–30
- Route 9 (Circhester Bay)Fishing at bubbling spots in the water, Surfing in the overworld · Lv 39–43
- South Lake Miloch (Max Den C)Catch a wild Dynamax or Gigantamax Pokémon in a Max Raid battle. · Lv 25–40
- South Lake Miloch (Max Den D)Catch a wild Dynamax or Gigantamax Pokémon in a Max Raid battle. · Lv 15–30
- South Lake Miloch (Max Den E)Catch a wild Dynamax or Gigantamax Pokémon in a Max Raid battle. · Lv 15–30
- West Lake Axewell (Max Den F)Catch a wild Dynamax or Gigantamax Pokémon in a Max Raid battle. · Lv 25–40
Ultra Moon 3 areas
- Ancient Poni PathFishing at bubbling spots in the water, Fishing with a Super Rod · Lv 10–49
- Poni Breaker CoastFishing at bubbling spots in the water, Fishing with a Super Rod · Lv 10–49
- Seafolk VillageFishing at bubbling spots in the water, Fishing with a Super Rod · Lv 10–49
Ultra Sun 3 areas
- Ancient Poni PathFishing at bubbling spots in the water, Fishing with a Super Rod · Lv 10–49
- Poni Breaker CoastFishing at bubbling spots in the water, Fishing with a Super Rod · Lv 10–49
- Seafolk VillageFishing at bubbling spots in the water, Fishing with a Super Rod · Lv 10–49
Moon 3 areas
- Poni Breaker CoastFishing at bubbling spots in the water, Fishing with a Super Rod · Lv 10–43
- Poni WildsFishing at bubbling spots in the water, Fishing with a Super Rod · Lv 10–43
- Seafolk VillageFishing at bubbling spots in the water, Fishing with a Super Rod · Lv 10–43
Sun 3 areas
- Poni Breaker CoastFishing at bubbling spots in the water, Fishing with a Super Rod · Lv 10–43
- Poni WildsFishing at bubbling spots in the water, Fishing with a Super Rod · Lv 10–43
- Seafolk VillageFishing at bubbling spots in the water, Fishing with a Super Rod · Lv 10–43
Y 3 areas
- Ambrette TownSurfing · Lv 25–27
- Cyllage CitySurfing · Lv 25–27
- Road 8Surfing · Lv 25–27
X 3 areas
- Ambrette TownSurfing · Lv 25–27
- Cyllage CitySurfing · Lv 25–27
- Road 8Surfing · Lv 25–27
White 2 1 area
- Undella BaySurfing in dark spots · Lv 25–40
Black 2 1 area
- Undella BaySurfing in dark spots · Lv 25–40
White 2 areas
- Undella BaySurfing in dark spots · Lv 25–60
- Undella TownSurfing in dark spots · Lv 25–60
Black 2 areas
- Undella BaySurfing in dark spots · Lv 25–60
- Undella TownSurfing in dark spots · Lv 25–60
Platinum 2 areas
- Road 223Fishing with a Super Rod · Lv 30–40
- Road 230Fishing with a Super Rod · Lv 30–40
Pearl 2 areas
- Road 223Fishing with a Super Rod · Lv 30–40
- Road 230Fishing with a Super Rod · Lv 30–40
Diamond 2 areas
- Road 223Fishing with a Super Rod · Lv 30–40
- Road 230Fishing with a Super Rod · Lv 30–40
Emerald 30 areas
- Dewford TownFishing with a Good Rod, Fishing with a Super Rod · Lv 10–45
- Ever Grande CityFishing with a Good Rod, Fishing with a Super Rod · Lv 10–45
- Lilycove CityFishing with a Good Rod, Fishing with a Super Rod · Lv 10–45
- Mossdeep CityFishing with a Good Rod, Fishing with a Super Rod · Lv 10–45
- Pacifidlog TownFishing with a Good Rod, Fishing with a Super Rod · Lv 10–45
- Road 103Fishing with a Good Rod, Fishing with a Super Rod · Lv 10–45
- Road 105Fishing with a Good Rod, Fishing with a Super Rod · Lv 10–45
- Road 106Fishing with a Good Rod, Fishing with a Super Rod · Lv 10–45
- Road 107Fishing with a Good Rod, Fishing with a Super Rod · Lv 10–45
- Road 108Fishing with a Good Rod, Fishing with a Super Rod · Lv 10–45
- Road 109Fishing with a Good Rod, Fishing with a Super Rod · Lv 10–45
- Road 110Fishing with a Good Rod, Fishing with a Super Rod · Lv 10–45
- Road 115Fishing with a Good Rod, Fishing with a Super Rod · Lv 10–45
- Road 121Fishing with a Good Rod, Fishing with a Super Rod · Lv 10–45
- Road 122Fishing with a Good Rod, Fishing with a Super Rod · Lv 10–45
- Road 123Fishing with a Good Rod, Fishing with a Super Rod · Lv 10–45
- Road 124Fishing with a Good Rod, Fishing with a Super Rod · Lv 10–45
- Road 125Fishing with a Good Rod, Fishing with a Super Rod · Lv 10–45
- Road 126Fishing with a Good Rod, Fishing with a Super Rod · Lv 10–45
- Road 127Fishing with a Good Rod, Fishing with a Super Rod · Lv 10–45
- Road 128Fishing with a Good Rod, Fishing with a Super Rod · Lv 10–45
- Road 129Fishing with a Good Rod, Fishing with a Super Rod · Lv 10–45
- Road 130Fishing with a Good Rod, Fishing with a Super Rod · Lv 10–45
- Road 131Fishing with a Good Rod, Fishing with a Super Rod · Lv 10–45
- Road 132Fishing with a Good Rod, Fishing with a Super Rod · Lv 10–45
- Road 133Fishing with a Good Rod, Fishing with a Super Rod · Lv 10–45
- Road 134Fishing with a Good Rod, Fishing with a Super Rod · Lv 10–45
- Seafloor CavernFishing with a Good Rod, Fishing with a Super Rod · Lv 10–45
- Shoal CaveFishing with a Good Rod, Fishing with a Super Rod · Lv 10–45
- Slateport CityFishing with a Good Rod, Fishing with a Super Rod · Lv 10–45
Sapphire 30 areas
- Dewford TownFishing with a Good Rod, Fishing with a Super Rod · Lv 10–45
- Ever Grande CityFishing with a Good Rod, Fishing with a Super Rod · Lv 10–45
- Lilycove CityFishing with a Good Rod, Fishing with a Super Rod · Lv 10–45
- Mossdeep CityFishing with a Good Rod, Fishing with a Super Rod · Lv 10–45
- Pacifidlog TownFishing with a Good Rod, Fishing with a Super Rod · Lv 10–45
- Road 103Fishing with a Good Rod, Fishing with a Super Rod · Lv 10–45
- Road 105Fishing with a Good Rod, Fishing with a Super Rod · Lv 10–45
- Road 106Fishing with a Good Rod, Fishing with a Super Rod · Lv 10–45
- Road 107Fishing with a Good Rod, Fishing with a Super Rod · Lv 10–45
- Road 108Fishing with a Good Rod, Fishing with a Super Rod · Lv 10–45
- Road 109Fishing with a Good Rod, Fishing with a Super Rod · Lv 10–45
- Road 110Fishing with a Good Rod, Fishing with a Super Rod · Lv 10–45
- Road 115Fishing with a Good Rod, Fishing with a Super Rod · Lv 10–45
- Road 121Fishing with a Good Rod, Fishing with a Super Rod · Lv 10–45
- Road 122Fishing with a Good Rod, Fishing with a Super Rod · Lv 10–45
- Road 123Fishing with a Good Rod, Fishing with a Super Rod · Lv 10–45
- Road 124Fishing with a Good Rod, Fishing with a Super Rod · Lv 10–45
- Road 125Fishing with a Good Rod, Fishing with a Super Rod · Lv 10–45
- Road 126Fishing with a Good Rod, Fishing with a Super Rod · Lv 10–45
- Road 127Fishing with a Good Rod, Fishing with a Super Rod · Lv 10–45
- Road 128Fishing with a Good Rod, Fishing with a Super Rod · Lv 10–45
- Road 129Fishing with a Good Rod, Fishing with a Super Rod · Lv 10–45
- Road 130Fishing with a Good Rod, Fishing with a Super Rod · Lv 10–45
- Road 131Fishing with a Good Rod, Fishing with a Super Rod · Lv 10–45
- Road 132Fishing with a Good Rod, Fishing with a Super Rod · Lv 10–45
- Road 133Fishing with a Good Rod, Fishing with a Super Rod · Lv 10–45
- Road 134Fishing with a Good Rod, Fishing with a Super Rod · Lv 10–45
- Seafloor CavernFishing with a Good Rod, Fishing with a Super Rod · Lv 10–45
- Shoal CaveFishing with a Good Rod, Fishing with a Super Rod · Lv 10–45
- Slateport CityFishing with a Good Rod, Fishing with a Super Rod · Lv 10–45
Ruby 30 areas
- Dewford TownFishing with a Good Rod, Fishing with a Super Rod · Lv 10–45
- Ever Grande CityFishing with a Good Rod, Fishing with a Super Rod · Lv 10–45
- Lilycove CityFishing with a Good Rod, Fishing with a Super Rod · Lv 10–45
- Mossdeep CityFishing with a Good Rod, Fishing with a Super Rod · Lv 10–45
- Pacifidlog TownFishing with a Good Rod, Fishing with a Super Rod · Lv 10–45
- Road 103Fishing with a Good Rod, Fishing with a Super Rod · Lv 10–45
- Road 105Fishing with a Good Rod, Fishing with a Super Rod · Lv 10–45
- Road 106Fishing with a Good Rod, Fishing with a Super Rod · Lv 10–45
- Road 107Fishing with a Good Rod, Fishing with a Super Rod · Lv 10–45
- Road 108Fishing with a Good Rod, Fishing with a Super Rod · Lv 10–45
- Road 109Fishing with a Good Rod, Fishing with a Super Rod · Lv 10–45
- Road 110Fishing with a Good Rod, Fishing with a Super Rod · Lv 10–45
- Road 115Fishing with a Good Rod, Fishing with a Super Rod · Lv 10–45
- Road 121Fishing with a Good Rod, Fishing with a Super Rod · Lv 10–45
- Road 122Fishing with a Good Rod, Fishing with a Super Rod · Lv 10–45
- Road 123Fishing with a Good Rod, Fishing with a Super Rod · Lv 10–45
- Road 124Fishing with a Good Rod, Fishing with a Super Rod · Lv 10–45
- Road 125Fishing with a Good Rod, Fishing with a Super Rod · Lv 10–45
- Road 126Fishing with a Good Rod, Fishing with a Super Rod · Lv 10–45
- Road 127Fishing with a Good Rod, Fishing with a Super Rod · Lv 10–45
- Road 128Fishing with a Good Rod, Fishing with a Super Rod · Lv 10–45
- Road 129Fishing with a Good Rod, Fishing with a Super Rod · Lv 10–45
- Road 130Fishing with a Good Rod, Fishing with a Super Rod · Lv 10–45
- Road 131Fishing with a Good Rod, Fishing with a Super Rod · Lv 10–45
- Road 132Fishing with a Good Rod, Fishing with a Super Rod · Lv 10–45
- Road 133Fishing with a Good Rod, Fishing with a Super Rod · Lv 10–45
- Road 134Fishing with a Good Rod, Fishing with a Super Rod · Lv 10–45
- Seafloor CavernFishing with a Good Rod, Fishing with a Super Rod · Lv 10–45
- Shoal CaveFishing with a Good Rod, Fishing with a Super Rod · Lv 10–45
- Slateport CityFishing with a Good Rod, Fishing with a Super Rod · Lv 10–45